
 Sign Out


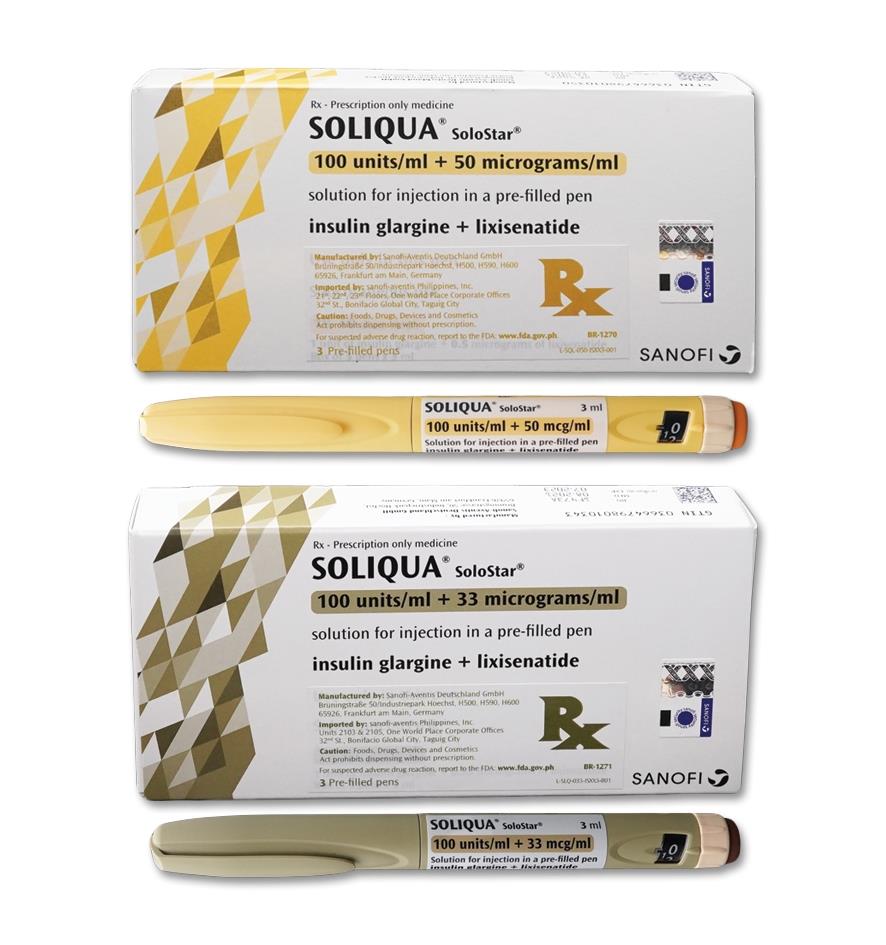
Soliqua (10-40) pen contains insulin glargine and lixisenatide. The combination of medicinal products in this pen is for the daily injection of 10 to 40 dose steps of Soliqua.
Soliqua (30-60) pen contains insulin glargine and lixisenatide. The combination of medicinal products in this pen is for the daily injection of 30 to 60 dose steps of Soliqua.
Never re-use needles. If patient might not get full dose (under dosing) or get too much (overdosing) as the needle could block.
Never use a syringe to remove medicine product from the pen. Patient may not get the correct amount of medicine.
Important information: Never share the pen.
Never use the pen if it is damaged or if not sure if it is working properly.
Always perform a safety test (See STEP 3).
Always carry a spare pen and spare needles in case they get lost or stop working.
Always check the label of the pen before use to make sure that it is the correct pen.
Learn to inject: Talk with healthcare provider about how to inject, before using the pen.
Ask for help if their will be problems in handling the pen, for example, problems with sight.
Read all of these instructions before using the pen. Follow steps carefully.
Extra items needed: A new sterile needle (see STEP 2); a sharps container for used needles and pens (see Throwing the pen away).
Places to inject: Upper arms, stomach, thighs.
Step 1: Check the pen: Take a new pen out of the refrigerator at least 1 hour before injecting. Injecting cold medication is painful.
A. Check the name and expiry date on the label of the pen.
Make sure that it is the correct medicine. The pen is peach coloured with an orange injection button.
Do not use pen if there is a need of a daily dose less than 10 dose steps or if 40 dose steps is needed. Discuss with the doctor which pen is suitable for the patient's needs.
Do not use pen after the expiry date.
B. Pull off the pen cap.
C. Check that the medicine is clear.
Do not use the pen if the medicine looks cloudy, coloured or contains particles.
Step 2: Attach a new needle: Do not reuse needles. Always use a new sterile needle for each injection. This helps stop blocked needles, contamination, and infection.
Always use needles that are compatible for use with Soliqua pen.
A. Take a new needle and peel off the protective seal.
B. Keep the needle straight and screw it onto the pen until fixed. Do not over-tighten.
C. Pull off the outer needle cap. Keep this for later.
D. Pull off the inner needle cap and throw away.
Handling needles: Take care when handling needles to prevent needle injury and cross-infection.
Step 3: Do a safety test: Always do a safety test before each injection to: Check the pen and the needle to make sure they are working properly.
Make sure that patient gets the correct dose.
A. Select 2 dose steps by turning the dose selector until the dose pointer is at the 2 mark.
B. Press the injection button all the way in.
When medicine comes out of the needle tip, the pen is working correctly, the dose selector will be reset to "0".
If no liquid appears: Patient may need to repeat this step up to 3 times before seeing medicine. If no medicine comes out after the third time, the needle may be blocked. If this happens, change the needle (see STEP 6 and STEP 2), then repeat the safety test (STEP 3).
Do not use the pen if there is still no medicine coming out of the needle tip. Use a new pen.
Do not use a syringe to remove medicine from the pen.
If there are air bubbles: Air bubbles in the medicine is normal and will not cause harm.
Step 4: Select the dose: Use this pen only to inject single daily doses from 10 to 40 or 30-60 dose steps.
Do not select a dose or press the injection button without a needle attached. This may damage the pen.
A. Make sure a needle is attached and the dose is set to '0'.
B. Turn the dose selector until the dose pointer lines up with the dose.
If patient turn past the dose, patient can turn back down. If there are not enough dose steps left in the pen for the dose, the selector will stop at the number of dose steps left.
If patient cannot select the full prescribed dose, use a new pen or inject the remaining dose steps and use a new pen to complete the dose. Only in this case, it is okay to inject a partial dose of less than 10 dose steps. Always use another Soliqua (10-40 or 30-60) pen to complete the dose and no other pen.
How to read the dose window: Do not use pen if single daily dose is less than 10 dose steps, shown as white numbers on a black background.
Units of medicine in the pen: The pen contains a total of 300 dose steps. Patient can select dose in steps of 1 dose step.
Do not use this pen if patient needs a single daily dose that is less than 10 dose steps, or more than 40 dose steps for Soliqua (10-40), or less than 30 dose steps, or more than 60 dose steps for Soliqua (30-60).
Each pen contains more than 1 dose.
Step 5: Inject the dose. If patient finds it hard to press the injection button in, do not force it as this may break the pen: Change the needle (see STEP 6 "Remove the needle" and STEP 2 "Attach a new needle") then do a safety test (see STEP 3).
If patient still find it hard to press in, get a new pen.
Do not use a syringe to remove medicine from the pen.
A. Choose a place to inject.
B. Push the needle into the skin as shown by the healthcare provider.
Do not touch the injection button yet.
C. Place thumb on the injection button. Then press all the way in and hold.
Do not press at an angle. The thumb could block the dose selector from turning.
D. Keep the injection button held in and when patient sees "0" in the dose window, slowly count to 10. This will make sure to get full dose.
E. After holding and slowly counting to 10, release the injection button. Then remove the needle from the skin.
Step 6: Remove the needle: Take care when handling needles to prevent needle injury and cross-infection.
Do not put the inner needle cap back on.
A. Grip the widest part of the outer needle cap. Keep the needle straight and guide it into the outer needle cap back. Then push firmly on.
The needle can puncture the cap if it is recapped at an angle.
B. Grip and squeeze the widest part of the outer needle cap. Turn the pen several times with the other hand to remove the needle.
Try again if the needle does not come off the first time.
C. Throw away the used needle in a puncture resistant container (see Throwing the pen away).
D. Put the pen cap back on.
Do not put the pen back in the refrigerator.
How to store the pen: Before first use: Keep new pens in the refrigerator between 2°C to 8°C. Do not freeze.
After first use: Keep the pen at room temperature, below 25°C.
Do not put the pen back in the refrigerator.
Do not store the pen with the needle attached.
Store pen with pen cap on.
Only use pen for up to 28 days after its first use.
How to care for the pen: If the pen may be damaged, do not try to fix it. Use a new one.
Protect the pen from dust and dirt: Patient can clean the outside of the pen by wiping it with a damp cloth (water only). Do not soak, wash or lubricate the pen. This may damage it.
Throwing the pen away: Remove the needle before throwing the pen away. Throw away the used pen as instructed by the pharmacist or local authority.


UserName
Profession Email
Profession Email